DIGITAL PHOTOGRAPHY & IMAGING -WEEK 4
May 12,2025
DIGIT.PHOTO & IMAG. | WEEK 4: Adjustment layers & filters
|| 12/05/25 – 18/05/25 (Week 4)
|| Low Xin Er, 0374596
|| Digital Photography & Imaging
|| Lecture 4: Introduction to Photoshop3: Adjustment Layers & Filters
1.Lectures
What is Adjustment Layer?
The Adjustment Layers in Photoshop are a group of a super useful, non-destructive image editing tools that add color and tonal adjustments to your image without permanently changing its pixels.
- Edit and discard your adjustments
- Restore your original image at any time.
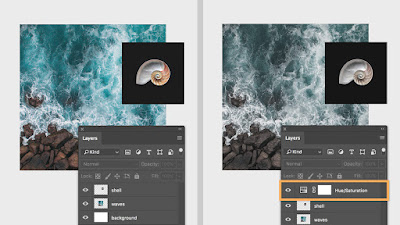
Basic understanding of Adjustment Layer
- Add an adjustment layer to your image
- A new layer will appear over your image
- Properties panel will pop up.
- Allow you to modify your adjustment layer, which in turn will modify your image.

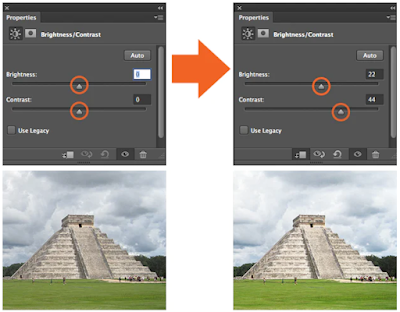
1. BRIGHTNESS / CONTRAST
The brightness slider is for adjusting the highlights in your image
The Contrast slider is for adjusting the shadows in your image.
2. LEVEL
Levels modify the tonal values in an image by adjusting the levels of the shadows, midtones, and highlights. 
3. CURVES
Curves let you adjust as many points as you want throughout the entire tonal range of your image.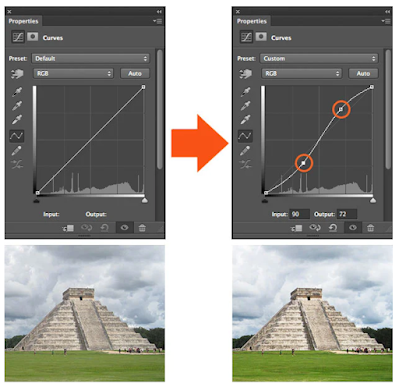
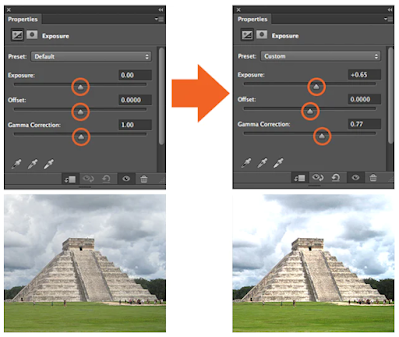
4. EXPOSURE
- Exposure lets you adjust exposure levels with three sliders: Exposure, Offset and Gamma.
- Exposure will adjust only the highlights of the image, Offset adjusts the mid tones and Gamma will adjust the dark tones only.
5. SELECTIVE COLOR
The Selective Color adjustment layer selectively modifies the amount of a primary color without modifying the other primary colors in your image.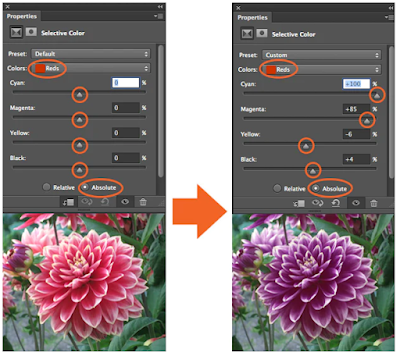
What is Filter?
Using filters to edit photos is an essential element of Adobe’s graphics editor.
There are filters to change colour, add blur or create completely new image effects.
REFERENCE:
How to use Adjustment Layer.
https://bit.ly/3uZzhGL
Photo filter trick in Photoshop
|| Low Xin Er, 0374596
|| Digital Photography & Imaging
|| Lecture 4: Introduction to Photoshop3: Adjustment Layers & Filters
Basic understanding of Adjustment Layer
- Add an adjustment layer to your image
- A new layer will appear over your image
- Properties panel will pop up.
- Allow you to modify your adjustment layer, which in turn will modify your image.
The Contrast slider is for adjusting the shadows in your image.
2. LEVEL
Levels modify the tonal values in an image by adjusting the levels of the shadows, midtones, and highlights.3. CURVES
Curves let you adjust as many points as you want throughout the entire tonal range of your image.4. EXPOSURE
- Exposure lets you adjust exposure levels with three sliders: Exposure, Offset and Gamma.
- Exposure will adjust only the highlights of the image, Offset adjusts the mid tones and Gamma will adjust the dark tones only.
5. SELECTIVE COLOR
The Selective Color adjustment layer selectively modifies the amount of a primary color without modifying the other primary colors in your image.What is Filter?
There are filters to change colour, add blur or create completely new image effects.
REFERENCE:
How to use Adjustment Layer.
https://bit.ly/3uZzhGLPhoto filter trick in Photoshop
2.Tutorials
1. PROJECT 1B - PART 1: Hearst Mansion- Follow instructions from the W4_HEARST MANSION:
2. PROJECT 1B - PART 2: Recoloring Black and White
- Follow instructions from the W6_RECOLORING BREAKDOWN:
EXERCISE 1: (Tutorial Demo in Class)
EXERCISE 2: https://drive.google.com/file/d/1bmNokgEamSgp0wzdGl-6sggcNrVI1JtY/view
SUBMISSION ON E-PORTFOLIO
Attach your Week 4 E-Portfolio link on this submission.
How to remove background
- Pen tool>hold option and click to convert/delete anchor point
- Select as much as can>right click>make selection
- Select(window)>refine edge>view on white>smooth+20>contrast+30
- Use[ ]keys adjust brush size>brush edge of element to get back details
- Refine edge window>output to new layer with layer mask>done
How to add an adjustment
- Click the layer need adjust>right click>create clipping mask>start adjust on only 1 layer
Quickly fix skin tone
- filter(under layer window)>curves>take the line upwards from the center
- Select window>subject>click element>ctrl+blank space
- Click the selection layer>image window>adjustment>invert (ctrl+i)
2. PROJECT 1B - PART 2: Recoloring Black and White
EXERCISE 1: (Tutorial Demo in Class)
EXERCISE 2: https://drive.google.com/file/d/1bmNokgEamSgp0wzdGl-6sggcNrVI1JtY/view
Attach your Week 4 E-Portfolio link on this submission.
2.1 Project 1B-part 1:Hearst Mansion
Exe1:ShazamObject
- Quick selection tool>subtract background
- Add layer mask>apply layer mask
- Drag drop resize in background>free transform mode maintain aspect ratio(hold shift rescale)
- image>adjustment>match colour
- filter>noise>add noise
Create shadow
- New layer>brush tool>draw a black shadow
- filter>blur>gaussian blur>Adjust shadow layer opacity66%
Reflection
- Duplicate character’s layer>polygonal lasso tool
- image>adjustment>hue/saturation>until color looks like shadow
- filter>distort>ripple
Make sure only have 4 layers
1. mansion
2. shadow
3. reflection
4. shazam
Exe2: My Reflection
- Take selfie using the right lighting and eye level
- Create a distant between subject and background
- Dont shoot at night or low light condition
- Use own photo inserted into the my reflection
2.2 Project 1B-part 2:Recoloring Black&White
Select & pick color
- Marquee tool>Select skin colour>copy selection>paste in b&w portrait>rename skin colour
- Eyedropper tool(i) >Change sample size>5by5 average>Eyedropper tool(i) pick highlight
- New layer(for color)>Paint on blank space with brush tool(size30/hardness100%)>repeat for midtone ,shadow
- Repeat choosing hair reference>highlight/midtone/shadow
Refine Edge
- Quick selection tool>Roughly select hair>refine edge in select & mask(control bar)
- Select view on overlay>refine edge brush tool>output to layer mask
Recoloring B&W photo- Create layer mask for selection>Click original layer>solid color>color picker choose hair color
- Drag drop hair layer mask to new solid layer replace layer mask>softlight blending mode
- Repeat to face,fur,teeth&eye,earing pearl,earing
Background color- Add selection from all layer(character)>add new layer>clean layer mask with brush tool>invert layer mask>add layer mask to new solid layer>choose background colour>blending mode
3.Pratical
3.1 Project 1B-part 1:Hearst Mansion
3.1.1 Exercise 1:Hearst Mansion (Exercise Demo)Sample of image:

 Fig. Exercise Demo object and background
Progress using Adobe Photoshop:

Final Outcome:

3.1.2 Exercise 2:Hearst Mansion (My Reflection)
Sample of image:


Fig.object and background
Object
- Quick selection tool>subtract background
- Add layer mask>apply layer mask
- Drag drop resize in background>free transform mode maintain aspect ratio(hold shift rescale)
- image>adjustment>match colour
- filter>noise>add noise
Create shadow
- New layer>brush tool>draw a black shadow
- filter>blur>gaussian blur>Adjust shadow layer opacity66%
Reflection
- Duplicate character’s layer>polygonal lasso tool
- image>adjustment>hue/saturation>until color looks like shadow
- filter>distort>ripple
Make sure only have 4 layers
1. mansion
2. shadow
3. reflection
4. shazam
Exe2: My Reflection
- Take selfie using the right lighting and eye level
- Create a distant between subject and background
- Dont shoot at night or low light condition
- Use own photo inserted into the my reflection
- Marquee tool>Select skin colour>copy selection>paste in b&w portrait>rename skin colour
- Eyedropper tool(i) >Change sample size>5by5 average>Eyedropper tool(i) pick highlight
- New layer(for color)>Paint on blank space with brush tool(size30/hardness100%)>repeat for midtone ,shadow
- Repeat choosing hair reference>highlight/midtone/shadow
- Quick selection tool>Roughly select hair>refine edge in select & mask(control bar)
- Select view on overlay>refine edge brush tool>output to layer mask
- Create layer mask for selection>Click original layer>solid color>color picker choose hair color
- Drag drop hair layer mask to new solid layer replace layer mask>softlight blending mode
- Repeat to face,fur,teeth&eye,earing pearl,earing
- Add selection from all layer(character)>add new layer>clean layer mask with brush tool>invert layer mask>add layer mask to new solid layer>choose background colour>blending mode


Progress using Adobe Photoshop:

Final Outcome:


3.2 Project 1B-part 2:Recoloring Black&White
3.2.1 Exercise 1:Demo ExerciseSample of image:

Fig.B/W portrait

Fig.Skin Color

Fig.Hair color
Progress using Adobe Photoshop:

Final Outcome:
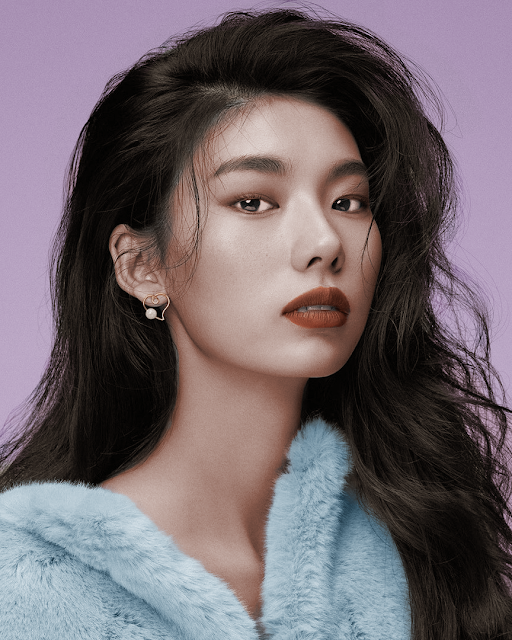
3.2.2 Exercise 2:Extra ExerciseSample of image:

 |
 |
 |
Fig.Hair color |


Fig.b/w portrait

Fig.Color reference
 |
Fig.b/w portrait |
 | |
|
Progress using Adobe Photoshop:

Final Outcome:


Comments
Post a Comment